Printing a document |
  
|
Printing a document |
|
To print the current document, choose the ribbon command File | Print  .
.
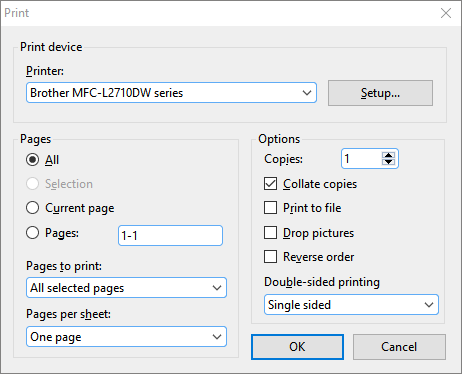
In the dialog box, you can make the following settings:
Printer
Here, select which of the installed printers should print the printout.
The Setup button opens a window for setting up and configuring the printer. For more information, see your printer manual.
Pages
Specify here the pages of the document to be printed:
▪All: Print all pages of the document.
▪Selection: Print only the section that is currently selected.
▪Current page: Print only the page on which the text cursor is positioned.
▪Pages: Print only the specified pages. To do this, enter the desired page numbers.
| Some examples: |
12 |
Print page 12 only |
12-15 |
Print pages 12 to 15 |
12- |
Print page 12 and all of the following pages |
-12 |
Print pages 1 to 12 |
| You can also enter more than one such page number by separating them with commas: |
2-5, 12 |
Print pages 2 to 5 and page 12 |
etc. |
|
▪You can also use the option Pages to print to specify whether all selected pages or only the pages with a even or odd page number should be printed.
▪For Pages per sheet, you can specify how many pages to print on a sheet of paper. Write usually prints only one page per sheet. However, you can instruct the program to output four pages (scaled down accordingly) per sheet at a time.
Options
This section of the dialog box contains additional printing options:
▪Copies
| Here, you can specify the number of copies of the document to be printed. |
▪Collate copies
| This option specifies whether to sort the print output by page number when printing multiple copies of a document. |
| If you enable this option and print multiple copies of a document with, for example, three pages, the pages will be output in the following order: 1-2-3, 1-2-3, 1-2-3, and so on. |
| If it is not enabled, the order will be: 1-1-1..., 2-2-2..., 3-3-3... |
| Note: Not all printers support this feature. |
▪Print to file
| This option redirects the print output to a file instead of a physical printer. |
▪Drop pictures
| This option skips all pictures and drawings when printing (useful for fast test printouts). |
▪Reverse order
| This option prints the pages from last to first. |
▪Double-sided printing
| Instead of printing on Single sided on the front side only, you can set here that the back side of a paper is also printed ("duplex printing"): |
| Double sided, long edge means you can turn the pages just like a book. |
| Double sided, short edge means you flip the pages up just like a clipboard. |
| Note: Your printer must support duplex printing to use this feature. |
To start printing, click on OK.
Tip: Before actually printing a document, you can preview the printout via the command File | Print preview. This feature enables you to avoid wasting paper on test prints.