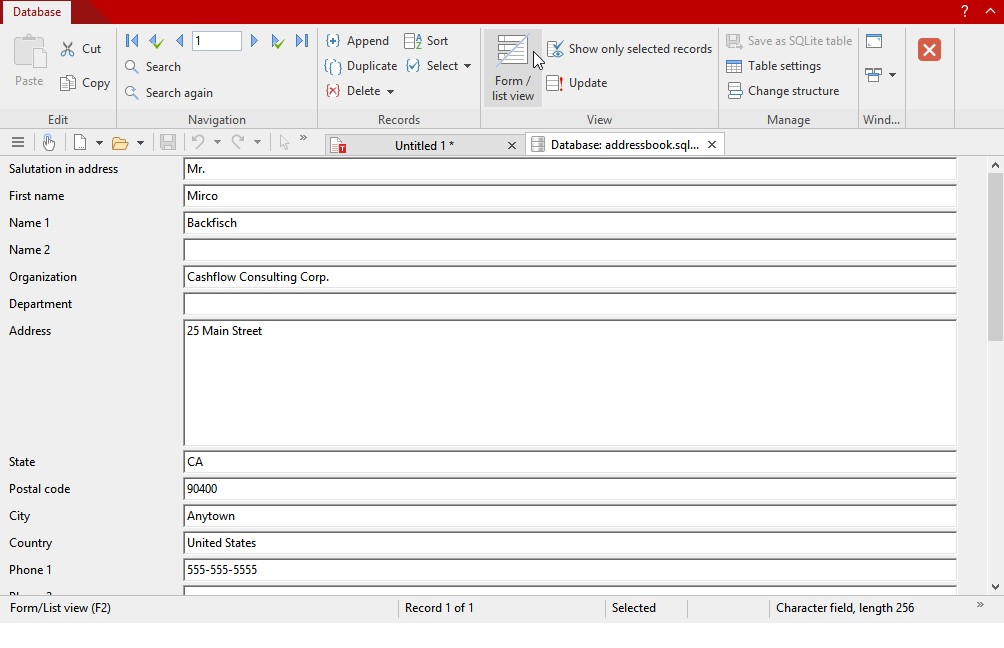
Write comes with an example database called addressbook.sqlite. On Windows, this file can be found in the Ashampoo folder below your user directory.
If you open the database with the command Edit database ![]() (on the ribbon tab Mailings | group Database), you are presented with a database window.
(on the ribbon tab Mailings | group Database), you are presented with a database window.
This database module may look as follows:

The example database addressbook.sqlite (in the form view)
If you see a tabular list of records instead, you can always choose the ribbon command Form/list (in the group View) to switch between the list view and the form view shown above.
If you like, you can use the example database addressbook.sqlite as your personal address database. It contains all the database fields needed to store addresses:
On the screen, you can now see the first record of the database, which consists of several fields. A data field is an information unit, for example, the first name. All information that you enter for a person (salutation, name, address, etc.) constitutes a record.
Information in the status bar
In the status bar at the bottom of the program window, you can read the following information:
▪First, the number of the current record (the record number) and the total number of records in the database are displayed ("Record 1 of X").
▪To the right of it, the program displays the following status information: Selected if the record is selected.
| For more information on selecting records, see Selecting data records. |
▪On the far right in the form view, you can see the field type of the current field, which determines which entries are allowed in the field:
| For SQLite: |
Field type |
Allowed entries |
Text |
Any entries |
Real Number |
Real numbers (with decimals) |
Integer |
Integers (no decimals) |
Logical |
Only Y for "Yes" or N for "No" |
Date |
Dates |
Time |
Times |
Datetime |
Combination of dates and times |
Long text |
Any entries for notes (long text) |
Binary |
Unstructured data objects, such as image files or programs |
| For dBASE: |
Field type |
Allowed entries |
Character |
Any |
Numeric |
Numbers |
Date |
Dates in the format MM/DD/YY (for example, "04/16/18") |
Logical |
Only Y for "Yes" or N for "No" |
Long text |
Any input for notes |
▪The maximum length of the field is displayed after the field type.
| Which century? Note when filling in date fields for dBASE: If you enter a two-digit year between 0 and 29, Write automatically prefixes "20...". For years between 30 and 99, Write prefixes "19...". |
| The entry "01/01/29" is interpreted as 1/1/2029. |
| The entry "01/01/30", on the other hand, is interpreted as 1/1/1930. |
Ribbon commands in the database module

The database module contains the following command groups for working with the database:
Command group |
Description of commands |
Edit |
Use the commands known from Moving, deleting and copying to easily edit the contents of records (only available in the form view). |
Navigation |
Use the small toolbar to navigate between records (see Scrolling through records) or use the commands Search/Search again to find specific search terms in the database. For more information, see Searching a database. |
Records |
Append adds a new record, and Duplicate creates a duplicate of a record. For more information, see Adding and editing data records. |
|
Delete: This button can be used to temporarily or permanently delete and restore records. For more information, see Deleting and restoring records. |
|
Sort: This option allows you to rearrange the records of the database. For more information, see Sorting a database. |
|
Select: Use this button to find commands to limit the records for mail merge printing. For more information, see Selecting records for a mail merge. |
View |
Form / list view: This option allows you to switch between form view (as shown in the figure above) and list view. For more information, see List and form view. |
|
Show only selected data records: This option hides all records that are not selected (useful for mail merge printing). |
|
Update: This option rereads the database in case it was changed by another application as a multi-user database. |
Manage |
Save as SQLite table: Use this command to convert the open database into SQLite format if the current database is in an inconvenient format. |
|
Table settings (only available for SQLite): Here, specify which field type should be used for display: text, number, date, etc. For more information, see Changing the database structure. |
|
Change structure: Here, you can change the structure of the existing database. For more information, see Changing the database structure. |
Windows |
Here, you can switch to full screen mode or between the windows. |
Close database |
Exit the database module. The database is saved automatically. |