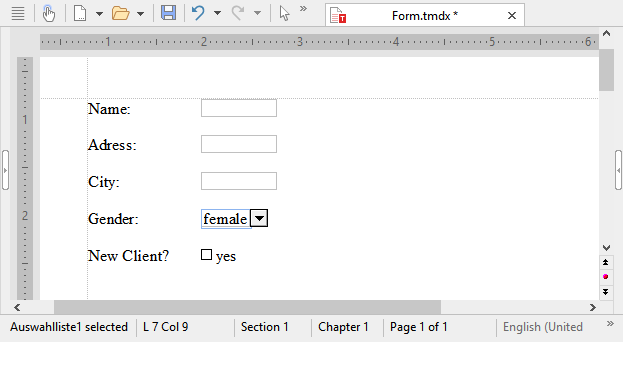
We come now to a practical example where we will prepare a form for recording client data. The form should contain some text fields for entering the client's address, a dropdown list for recording the client's gender and a checkbox for checking if the client is new.

Start a new document with the ribbon command File | New ![]() . Then proceed as follows:
. Then proceed as follows:
Text fields for free text entries
The first line of the form should contain a text field for entering the client's name. The best way to proceed is to first provide a description of what is to be entered in this field – for example, "Name:". Then insert the text field to the right of it.
Proceed as follows:
| 1. | Type "Name:" and then insert a tab with the Tab key. |
| 2. | Insert a Text field with the ribbon command Insert | group Objects | Form object |
| 3. | The text cursor is now positioned in the text field. Press the à key to return to the main text. |
| 4. | Press the Enter key↵ twice. |
The first line of the form is now complete. Create two further lines below in the same manner with the labels "Street:" and "City:".
Dropdown lists
A dropdown list should now be inserted below the three text fields. Dropdown lists allow users to choose from among several alternatives.
Proceed as follows:
| 1. | Type "Gender:" and then press Tab. |
| 2. | Choose the ribbon command Insert | group Objects | Form object |
| 3. | You now have to enter the values that are to appear in the list. Enter "Male" in the New entry field and click on Add. Then enter "Female" and click Add again. |
| 4. | Exit the dialog box with OK. |
| 5. | Press the Enter key↵ twice. |
Checkboxes for Yes/No entries
Finally, a checkbox should be inserted. Checkboxes can be used for Yes/No entries. If the box is checked, this means "Yes". If it is not checked, it means "No".
Thus, we will add a checkbox that should only be checked if the client is new:
| 1. | Type "New customer?" and then press Tab. |
| 2. | Choose the ribbon command Insert | group Objects | Form object |
| 3. | In the dialog box that now appears, you can enter a text if necessary on the Form object tab, which should appear next to the checkbox. For example, type "Yes". |
| 4. | Exit the dialog box with OK. |
| 5. | Press the Enter key↵ twice. |
To align the form objects vertically, you should now select all the lines you have entered and then use the ribbon command Layout | group Paragraph | Tabs to set a tab stop at the appropriate place – for example, at 1.2 in.

Our form is now complete.
You can now save the document and test it. For more information, see also Filling in forms.
The best way to test the form is to choose the ribbon command View | Form mode ![]() to enable form mode.
to enable form mode.